
The Altair Community and the RapidMiner community is on read-only mode until further notice. Technical support via cases will continue to work as is. For any urgent requests from Students/Faculty members, please submit the form linked here.
Options
Microsoft Azure Cognitive Services APIs - Analyzing Images
 sgenzer
Administrator, Moderator, Employee, RapidMiner Certified Analyst, Community Manager, Member, University Professor, PM Moderator Posts: 2,959
sgenzer
Administrator, Moderator, Employee, RapidMiner Certified Analyst, Community Manager, Member, University Professor, PM Moderator Posts: 2,959
The ML API space continues to evolve and I must say that Microsoft Azure has done a nice job with their new Cognitive Services APIs. Very clean and easy to use (unlike AWS' ML APIs which require all sorts of services to set up + use). Here's a simple example I built that takes a jpg image and identifies two famous "celebrities" - their names, their estimated ages (it seems to be rather generous in this sense), and their gender.
**IF YOU WANT TO OPEN THIS PROCESS IN RAPIDMINER, JUST CLICK ON THIS LINK**
The Azure Computer Vision API is very easy to use:
body: a JSON containing the url of the image
This is all easily done with the Send Request operator in the Web Automation extension:
NOTE that the body content type must be left BLANK. This is because Azure wants the body to be in ASCII instead of urlencoded (don't ask me why - seems very weird)
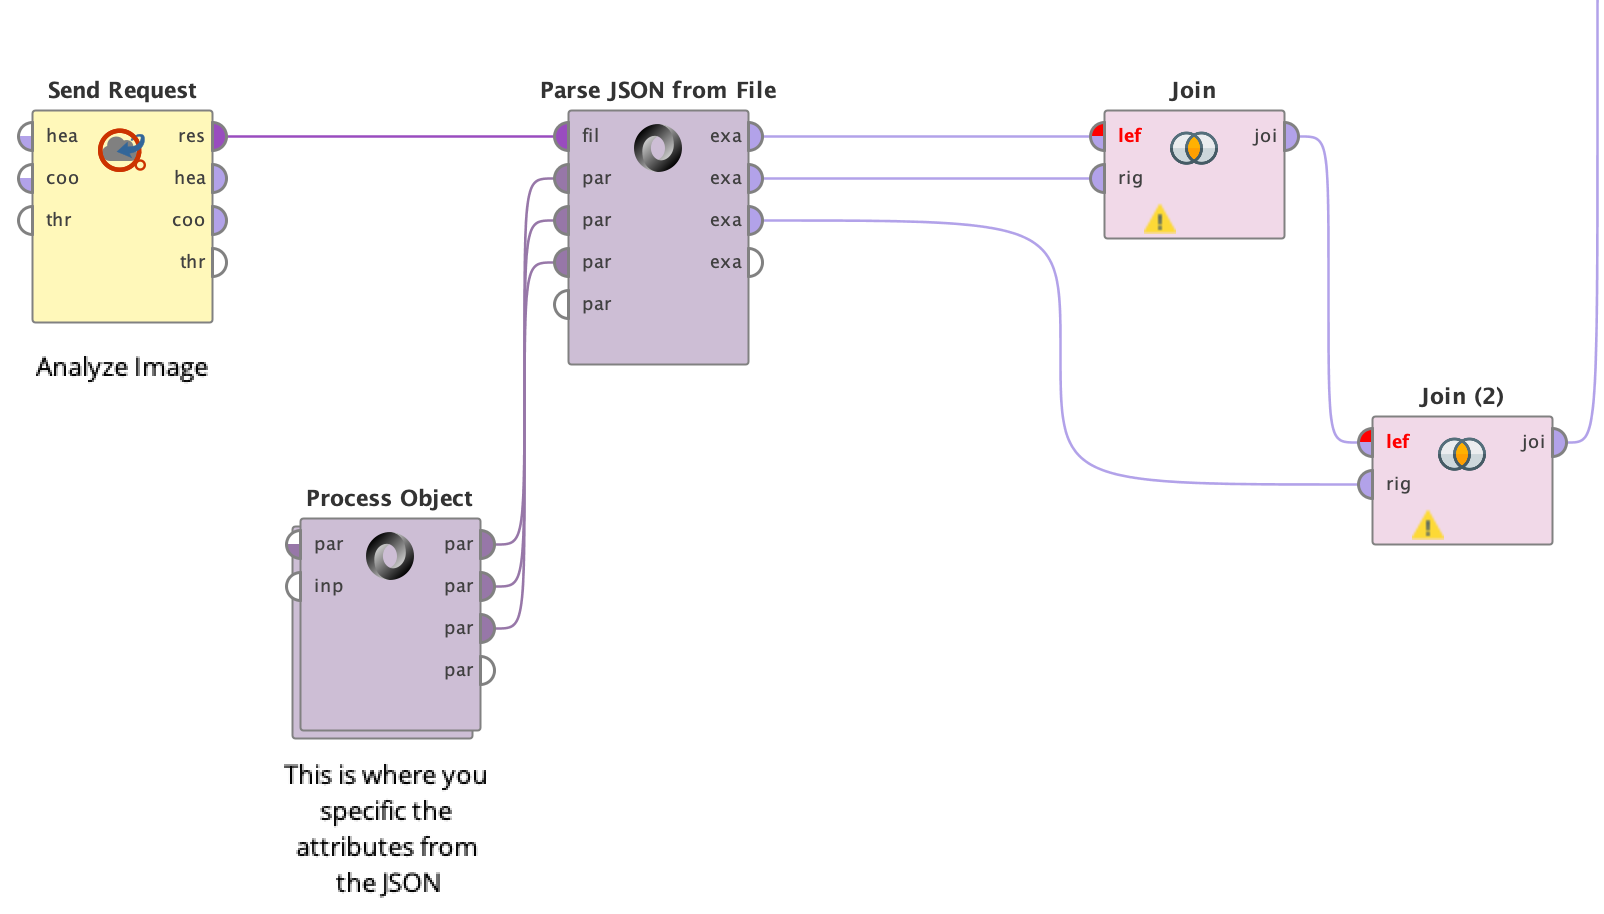
4. If you run this query, you will get this JSON:
and I parse it again using operators from the Web Automation extension (see process in Community Repo). Then join by ID and voilà!

Hope that makes sense. Enjoy!
Scott
**IF YOU WANT TO OPEN THIS PROCESS IN RAPIDMINER, JUST CLICK ON THIS LINK**
The Azure Computer Vision API is very easy to use:
- As with most APIs, you will need a key from Azure. You can get this by just signing up and adding Computer Vision to your account. As of now the link is here: https://azure.microsoft.com/en-us/try/cognitive-services/my-apis/
- Once you have your key, you can consume the API using standard RapidMiner API operators. My new go-to operators are the ones from the Web Automation extension (get it from the Marketplace and buy a license - well worth your while if you use APIs a lot).
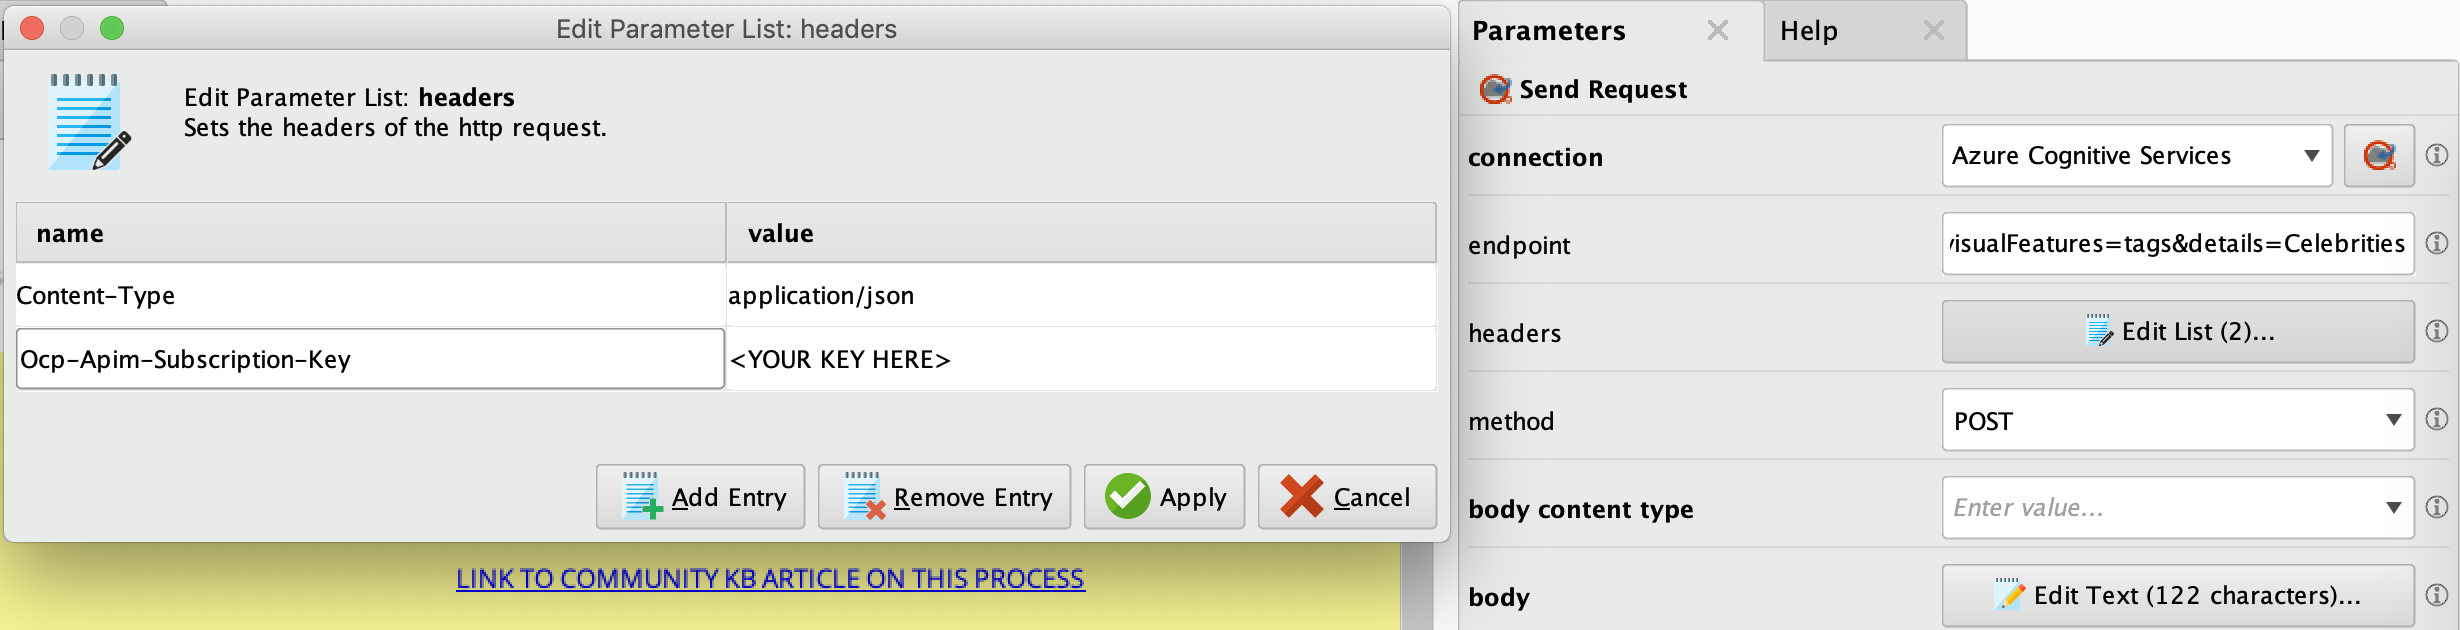
- The Analyze Image endpoint is a POST request, so we will need a body + two headers to execute this request:
body: a JSON containing the url of the image
{"url":"https://assets.vogue.com/photos/5cf6828f350791fabc089ac0/master/w_780,c_limit/00-story-trump-queen-elizabeth.jpg"}headers: the usual Content-Type: application/json, and the authentication header Ocp-Apim-Subscription-Key: <YOUR-KEY-HERE>This is all easily done with the Send Request operator in the Web Automation extension:
NOTE that the body content type must be left BLANK. This is because Azure wants the body to be in ASCII instead of urlencoded (don't ask me why - seems very weird)
4. If you run this query, you will get this JSON:
{
  "categories": [
    {
      "name": "people_group",
      "score": 0.2734375,
      "detail": {
        "celebrities": [
          {
            "name": "Donald Trump",
            "confidence": 0.99999880790710449,
            "faceRectangle": {
              "left": 168,
              "top": 112,
              "width": 101,
              "height": 101
            }
          },
          {
            "name": "Elizabeth II",
            "confidence": 0.998525083065033,
            "faceRectangle": {
              "left": 541,
              "top": 320,
              "width": 91,
              "height": 91
            }
          }
        ]
      }
    },
    {
      "name": "people_many",
      "score": 0.359375,
      "detail": {
        "celebrities": [
          {
            "name": "Donald Trump",
            "confidence": 0.99999880790710449,
            "faceRectangle": {
              "left": 168,
              "top": 112,
              "width": 101,
              "height": 101
            }
          },
          {
            "name": "Elizabeth II",
            "confidence": 0.998525083065033,
            "faceRectangle": {
              "left": 541,
              "top": 320,
              "width": 91,
              "height": 91
            }
          }
        ]
      }
    }
  ],
  "faces": [
    {
      "age": 61,
      "gender": "Male",
      "faceRectangle": {
        "left": 168,
        "top": 112,
        "width": 101,
        "height": 101
      }
    },
    {
      "age": 71,
      "gender": "Female",
      "faceRectangle": {
        "left": 541,
        "top": 320,
        "width": 91,
        "height": 91
      }
    }
  ],
  "requestId": "ed6ec4df-d769-445e-beba-ddfe0ddfd337",
  "metadata": {
    "width": 780,
    "height": 858,
    "format": "Jpeg"
  }
}
and I parse it again using operators from the Web Automation extension (see process in Community Repo). Then join by ID and voilà!
Hope that makes sense. Enjoy!
Scott
Tagged:
2